logo

Updates in Parta.io

New features and fixes are displayed on this page.
Coming soon
#Changed
Usability
6 days ago
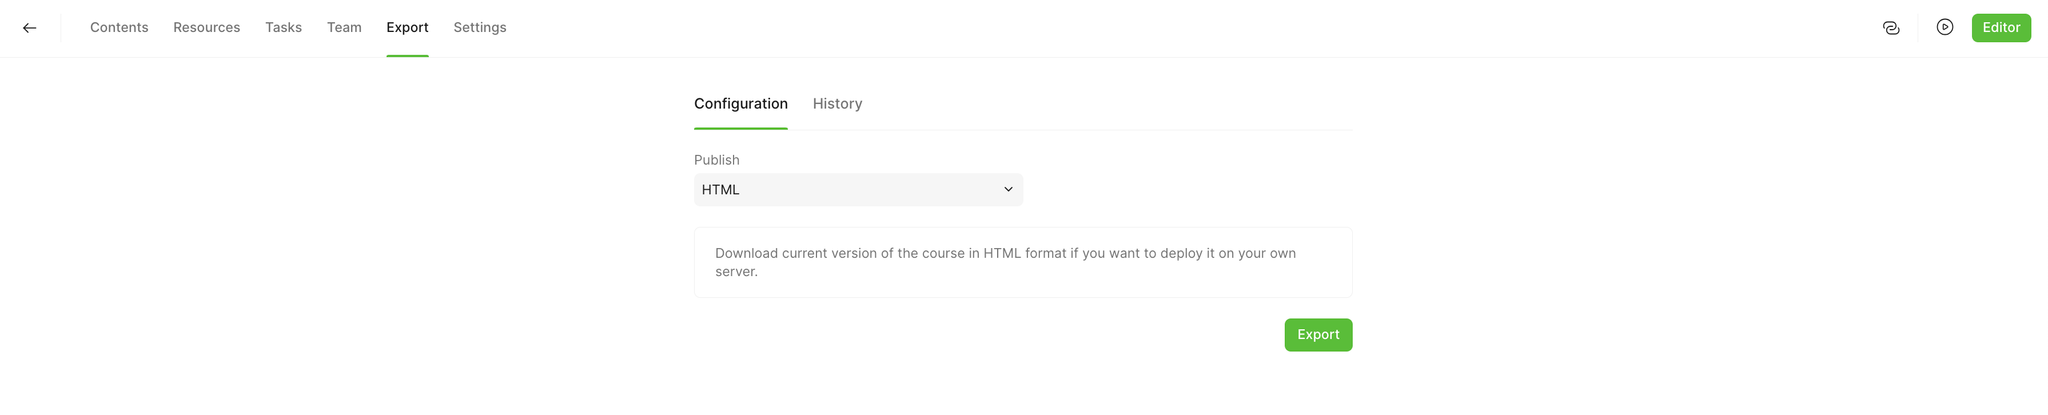
Now you can download courses in HTML format to conveniently publish them on your platform.
Image without caption

Coming soon
#Improved
Usability
6 days ago
To make it even more convenient for you to work with the platform, we have redesigned the logic of modal windows. Here are the innovations:
  • modal window closes:
by clicking outside of it;
by clicking the “Close” button in the upper right corner;
by clicking the submit button if all the necessary conditions are met;
  • when the window opens, the cursor automatically moves to the first active input field;
  • the “Cancel” and “Submit” buttons are fixed and do not move when you scroll through the contents of the window;
  • the “Submit” button is only available when you have filled out all the required information in the window;
  • Hotkeys are now active:
Escape closes the window;
Tab moves the cursor between fields.

Coming soon
#Changed
#Improved
Project
6 days ago
With update 2.35 you have more options to create unique designs. We have changed the color selection palette so that you can use not only the colors specified in the branding, but also unique shades.
For example, you want to highlight a mistake in red. Now you can do this directly in the editor, instead of adding the desired color to the branding.
The settings themselves have also become more intuitive thanks to the new icon design.
Image without caption

Coming soon
#Added
Usability
6 days ago
Meet the new functionality for convenient content translation! Now, in just a couple of clicks, you can upload courses in XLIFF and CSV formats, process and import translated files back into the system.
When you import a translated file, the system creates a separate copy of the course so that you can save the original version.
To translate course content, follow the steps: “Project” – “Settings” – “Course Translation”.
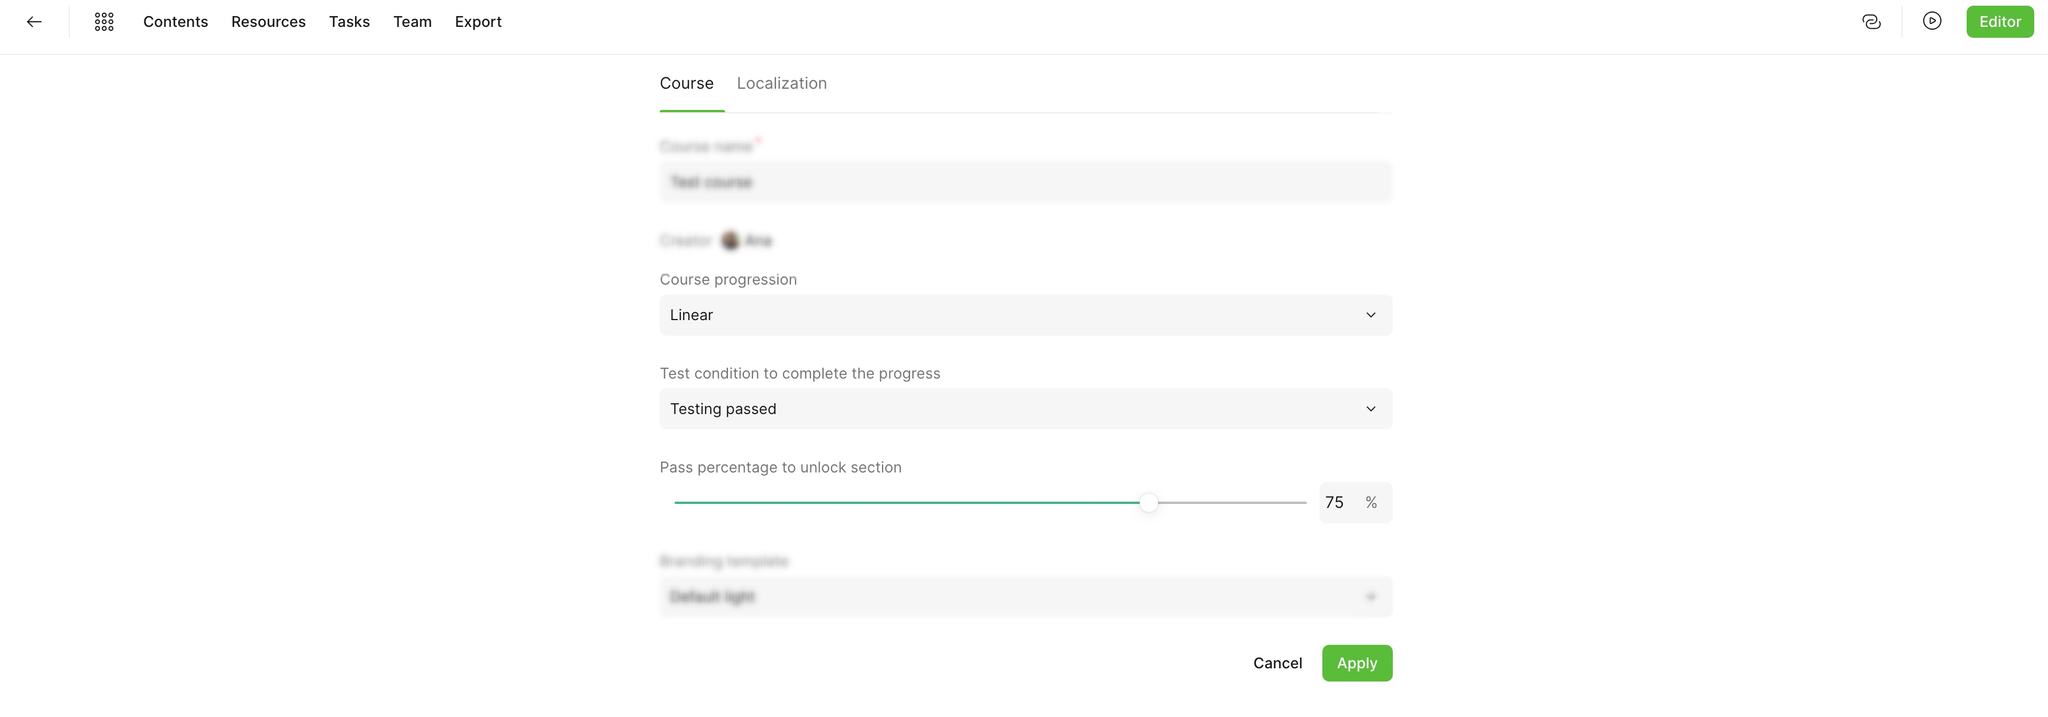
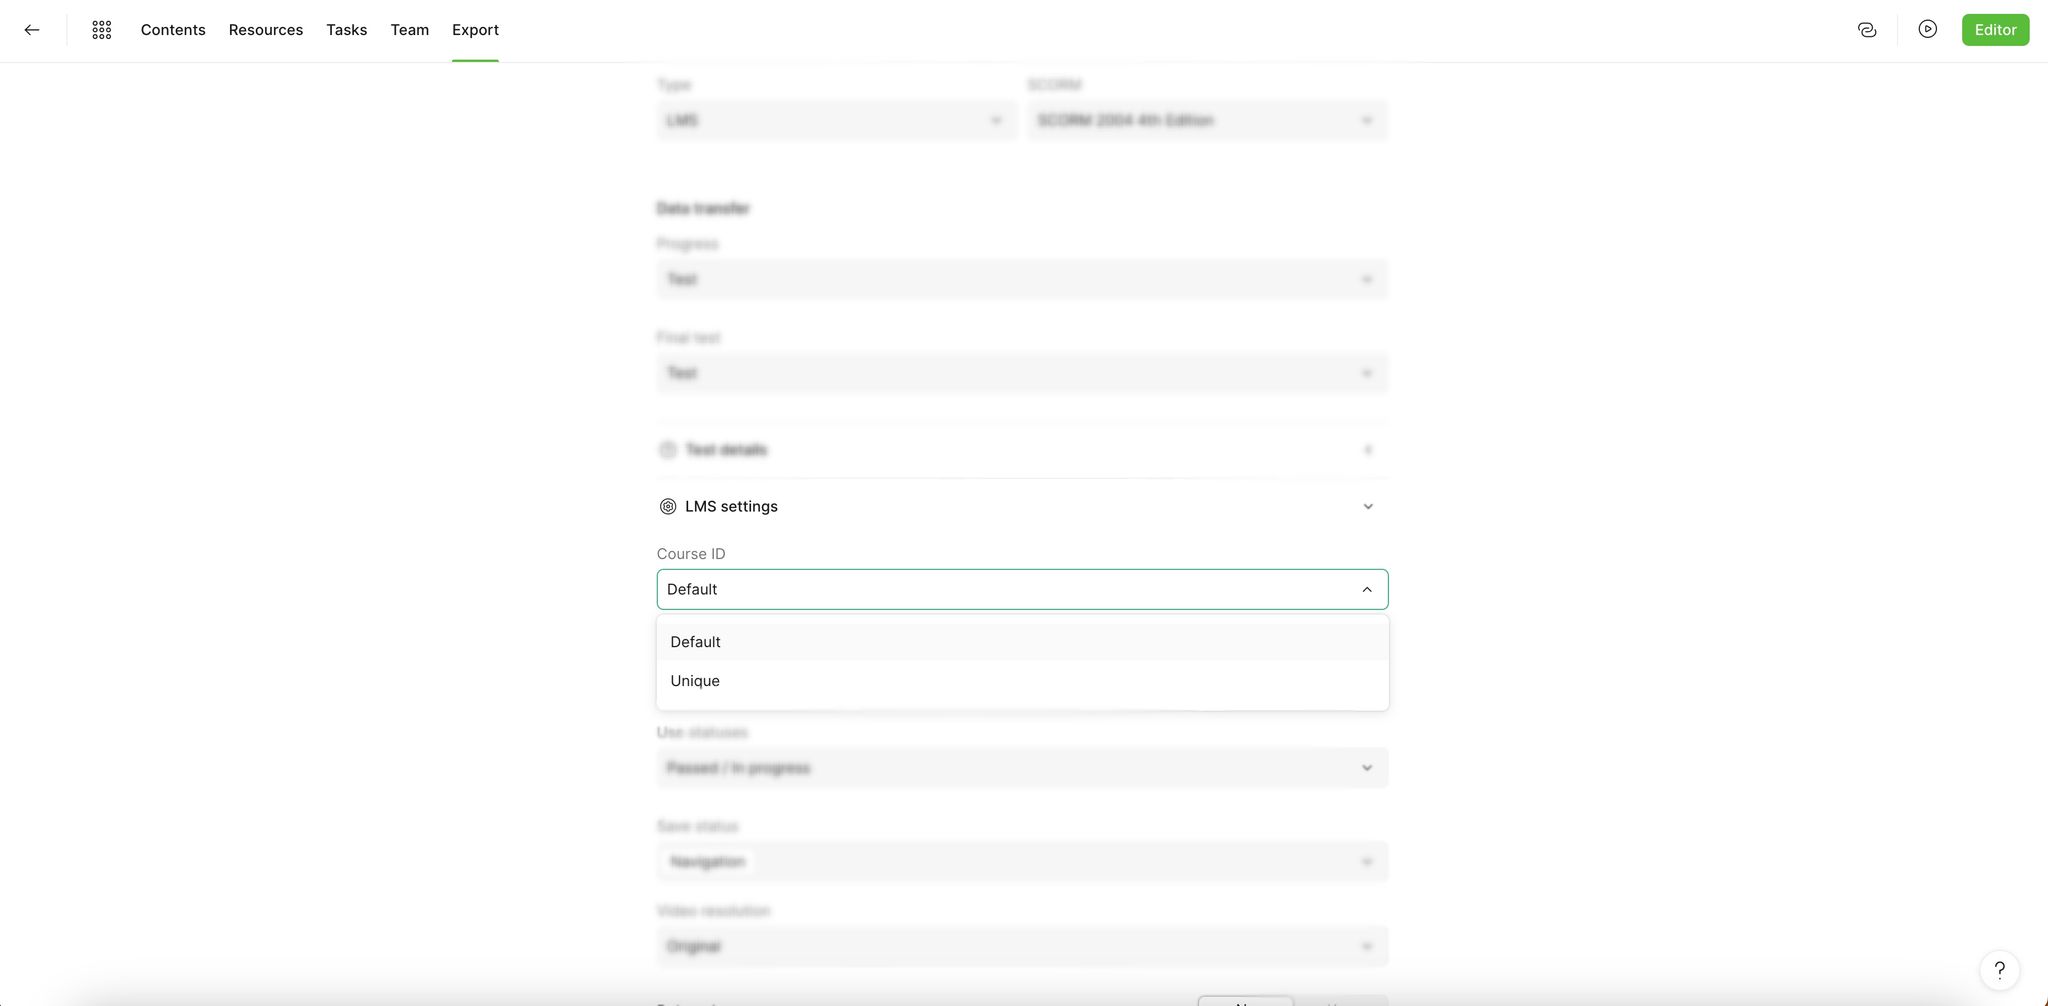
Remember that in addition to the content, you also need to translate system texts: designations of interface elements and tooltips. You can replace them manually or select the appropriate language in the course settings (on the “Interface Management” tab).

Coming soon
#Added
Usability
6 days ago
If you frequently create courses in foreign languages, you'll find the kit of the most popular ones useful: English, Turkish, Chinese, Spanish, French, German, Portuguese, Ukrainian, Italian, Polish, Romanian, Slovak, and Japanese.
To change the language, follow the steps: “Project” – “Settings” – “Interface Management” – “Use Standard” – “Language”. The choice of language affects all entities that cannot be controlled from the editor, but that users see while completing the course. For example, modal windows or tooltips in blocks.
If you manually change text in one language, remember that those changes will be removed when you change the language. For example, you selected Spanish and edited the tooltip text for the “Active Labels” template. When you change the language of the entire project to English, the tooltip will again contain the standard text that the system offers, but in English, not Spanish.

2.34
#Changed
Usability
Editor
14 days ago
To make it easier and more convenient for you to set up single-choice questions, we've redesigned the Lock setting - the toggle between Yes and No options. We've also added more tooltips to the interface to make it easier for you to understand what each setting means.
Image without caption

2.34
#Changed
#Improved
Editor
14 days ago
Active labels is a popular tool that can help make courses more interactive. We've improved the settings for active labels and fixed any issues with their functionality so you can create creative content.
Meet the new features:
  • creating labels without icons;
  • closing labels with scroll so they don't freeze on the screen;
  • setting up the font in the “Title” and “Description” fields;
  • “Switch” checkbox in the element settings, which will allow you to turn the display of arrows for moving between labels in the mobile and desktop versions on and off.
See what the arrow settings and font formatting for the title and label description look like in the mobile version:

2.34
#Changed
#Improved
Editor
Templates
14 days ago
Before, to create a new block or duplicate an existing one, each time you had to open a modal window and scroll for a long time to find the desired template. With update 2.34, you'll be able to find and add templates in just a couple of clicks!
In the left side menu, we have added quick access with two tabs: “Favorites” and “Recent” (10 templates you recently used are collected here).
Click on the template and it will appear under the selected or last block in the section.
Image without caption
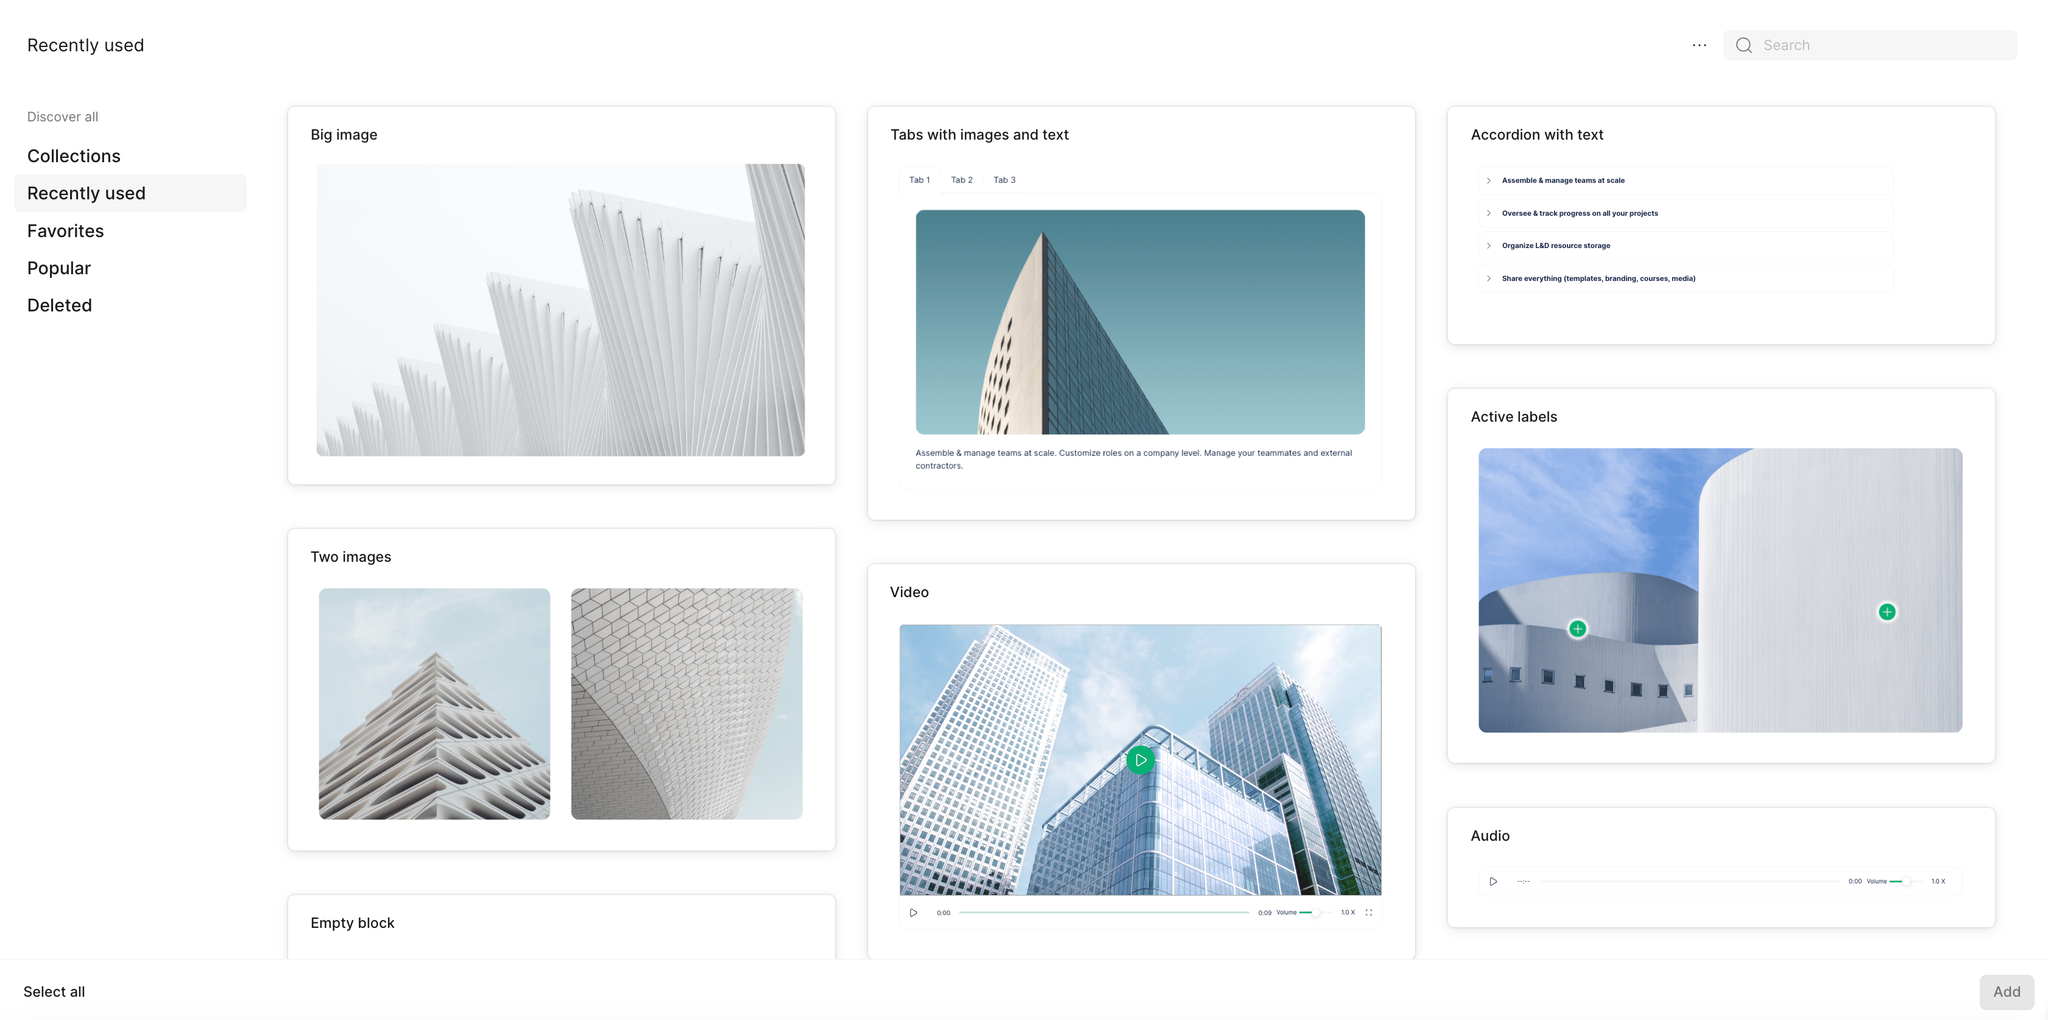
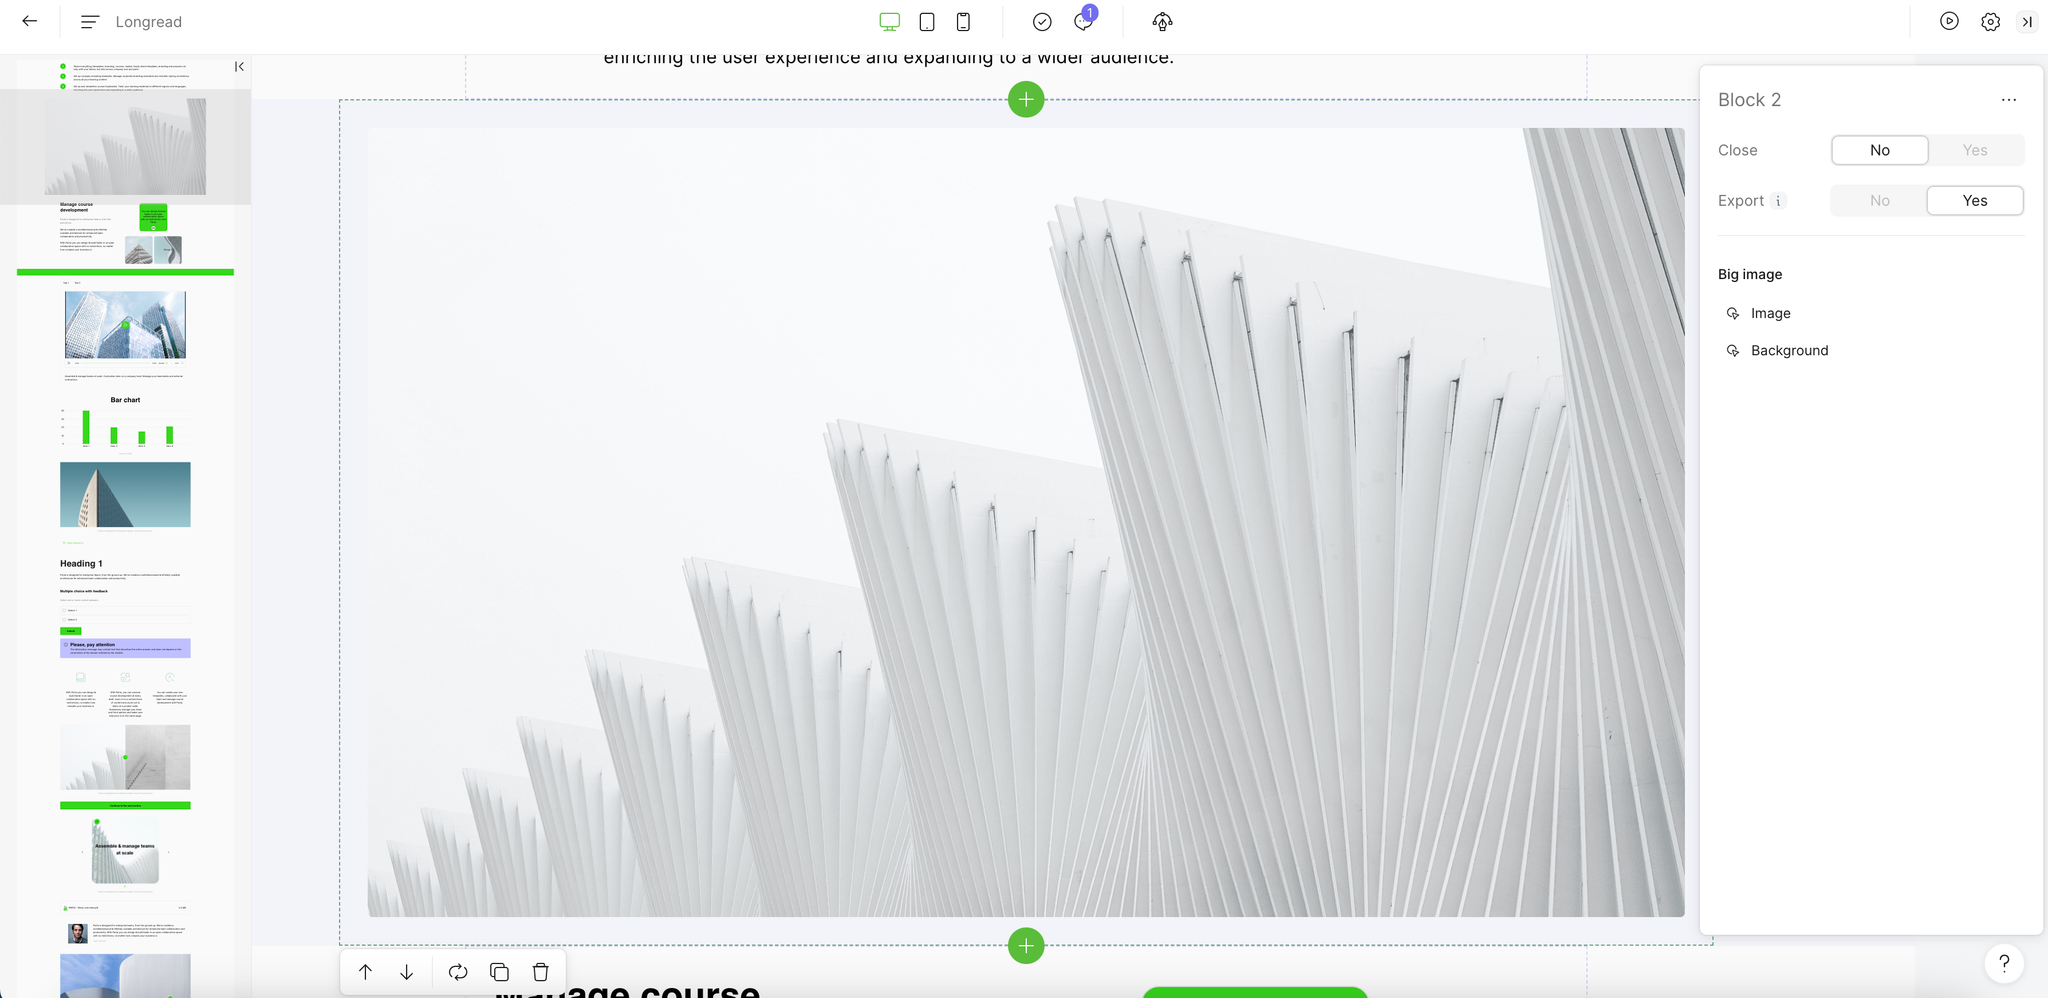
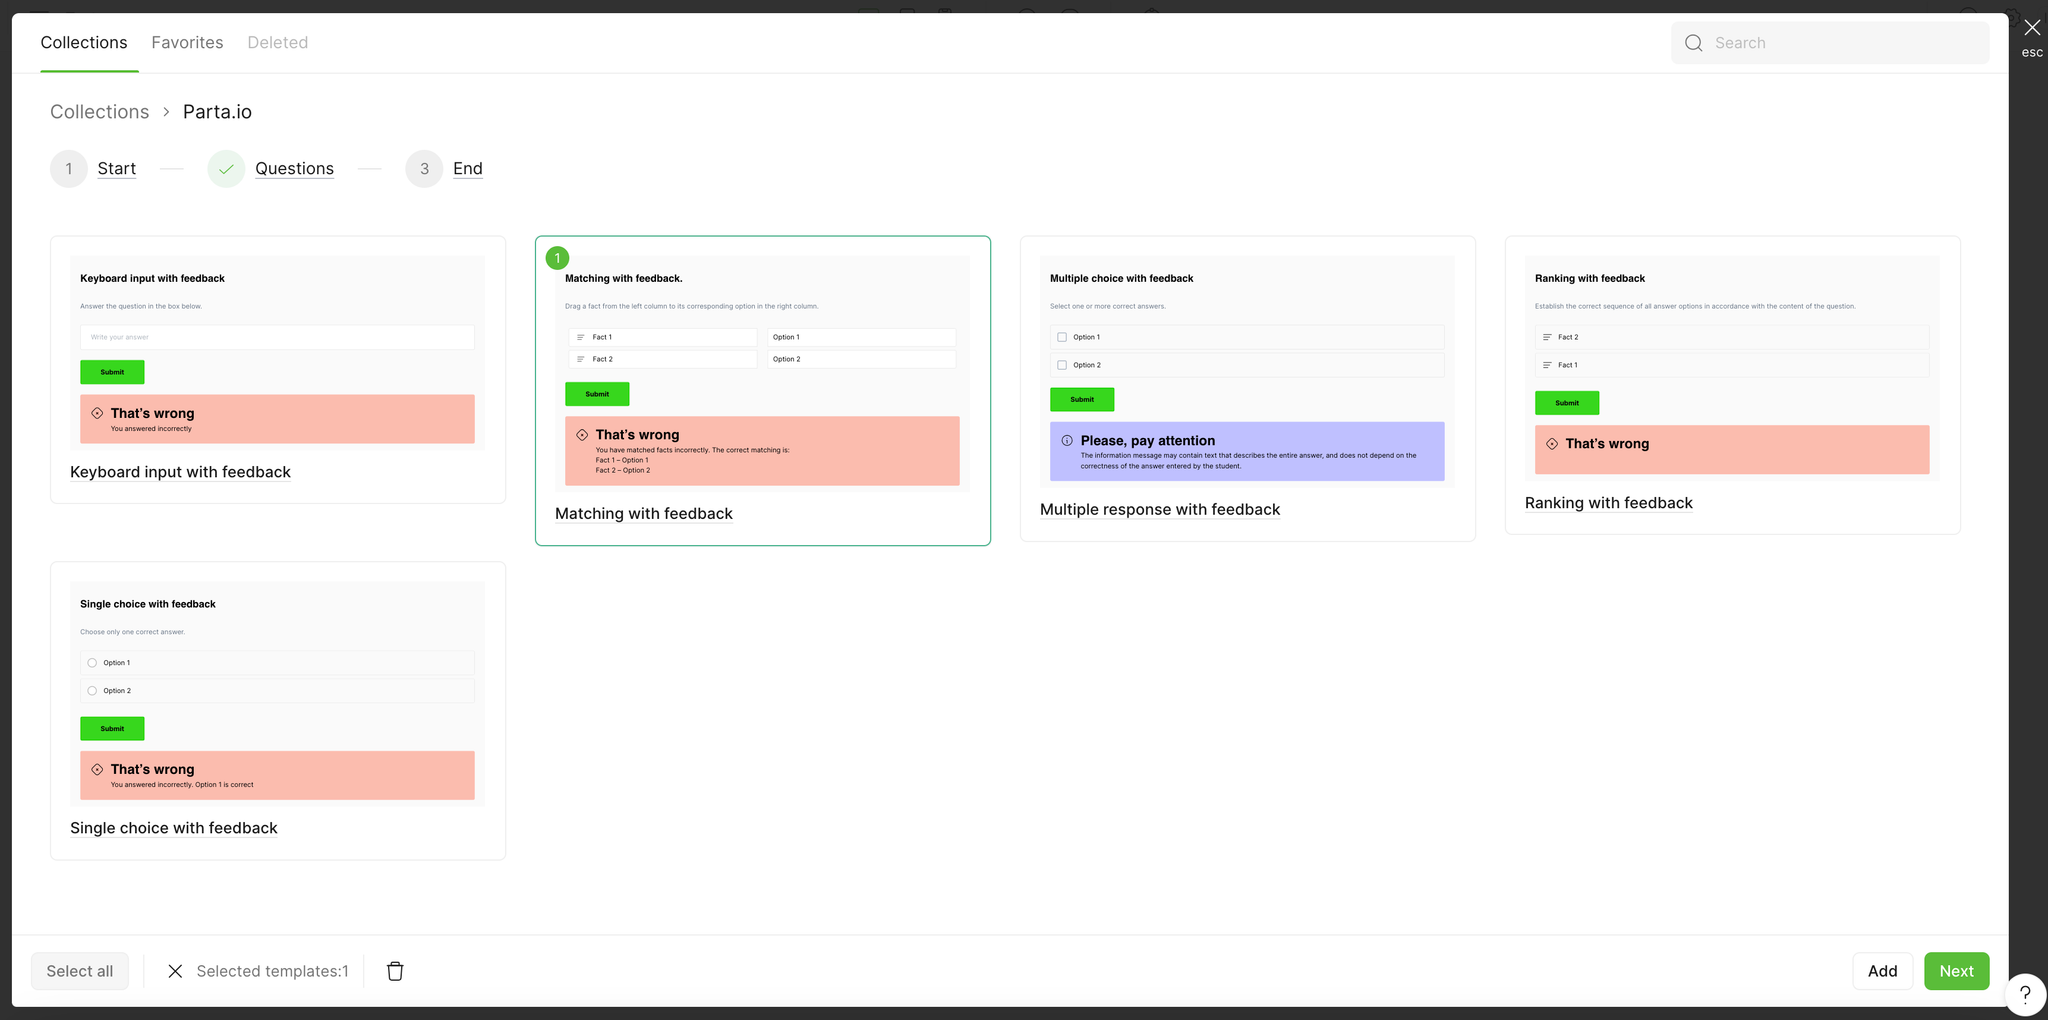
You can add a template to “Favorites” in the template selection modal window. They will be saved company-wide and will be available for all new projects so that working on them will be much easier.

2.34
#Changed
Editor
14 days ago
We know that many users would find it more convenient to be able to fix the side menu with the element’s settings in the content mode. And we give this opportunity! We've changed how the right side menu works so you can conveniently select settings for blocks.
Click on the button in the upper right corner to open the menu. It will show the settings of the block where your cursor is located. When you click on another block, the menu will not close (as it did before), but will show the settings for the new block.
Image without caption
Now the menu will be constantly on the screen. To hide it, click outside the active work area.

2.34
#Changed
Editor
Project
14 days ago
You no longer have to return to the Contents page to customize sections. Now you can add, delete and change them directly from the editor.

2.34
#Added
Branding
#Improved
14 days ago
Corporate style is not only colors and shapes, but also unique fonts. Now you can use them in Parta.io - upload individual fonts or entire font families to create unique courses.
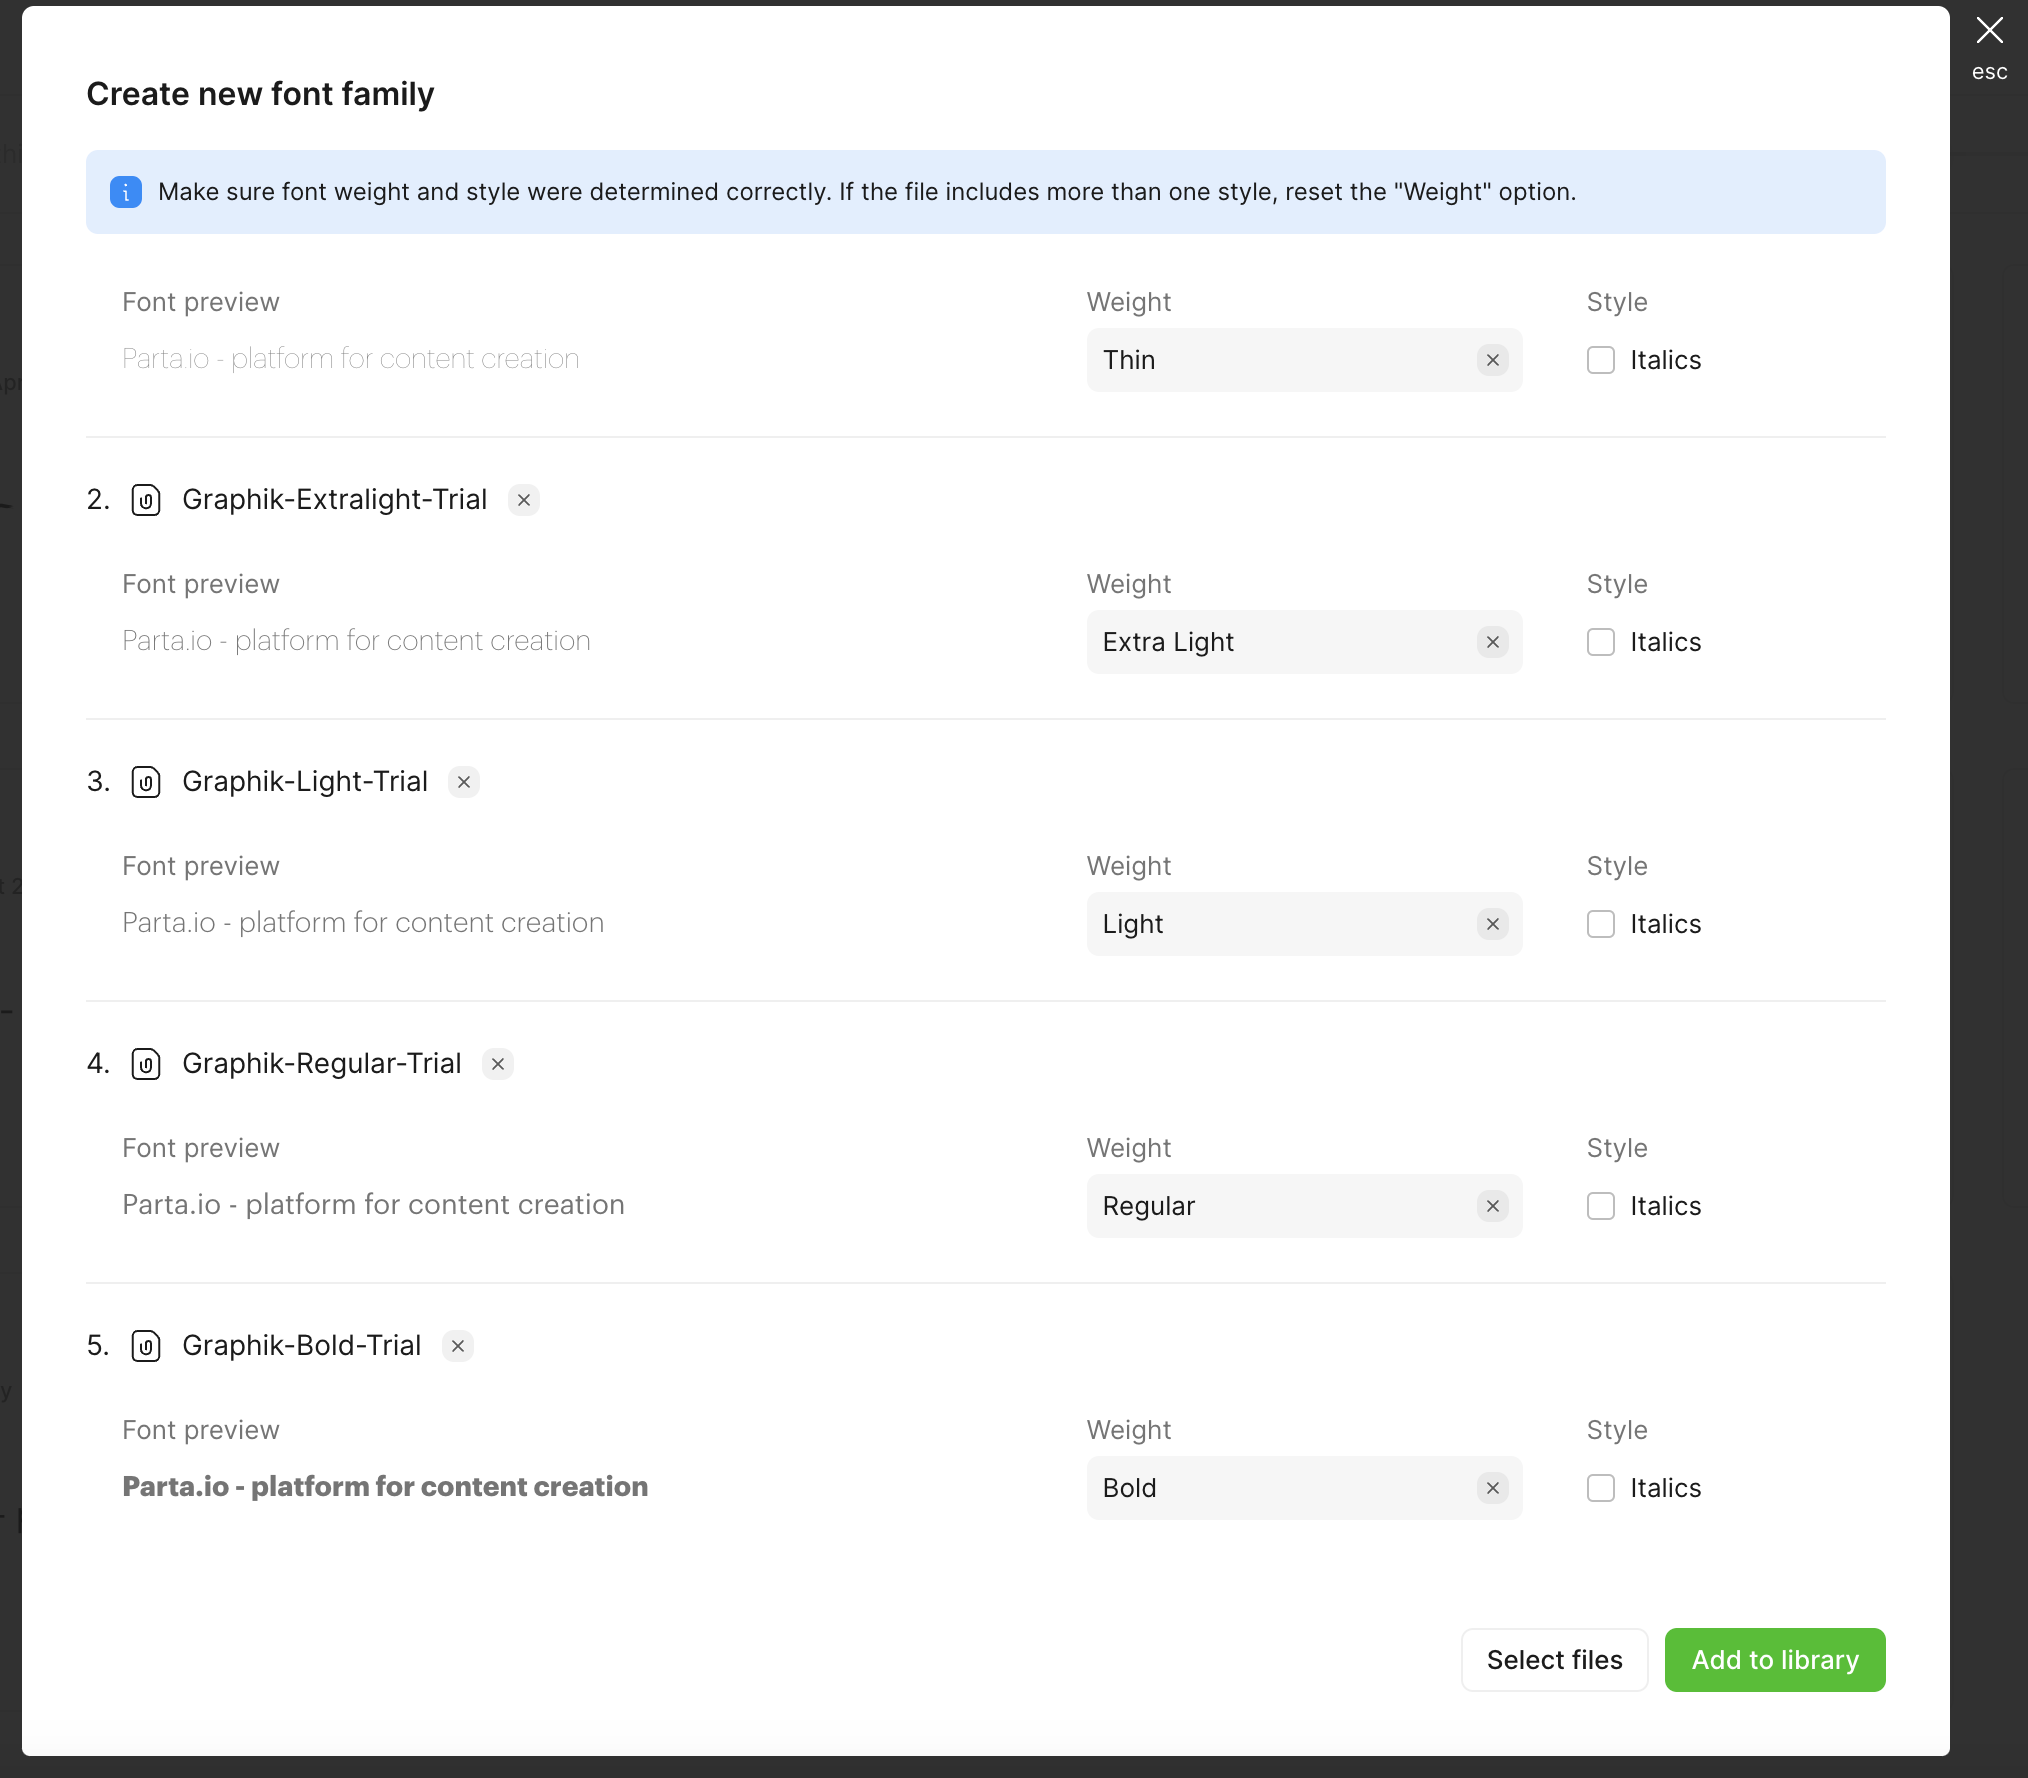
Check font family carefully before adding it to the library: once uploaded you will not be able to add a new font to the created family.
Also after 2.34 update you can:
  • set the weight for each font (when loading, the system will determine the weight automatically - if necessary, change it in the modal window before saving);
  • edit font names;
  • upload files in three formats: WOFF2, TTF and OTF;
  • edit fonts and choose styles for them.
Image without caption
The font settings window is now different for different editing modes:
Tabs:
Content-mode
Pro-mode
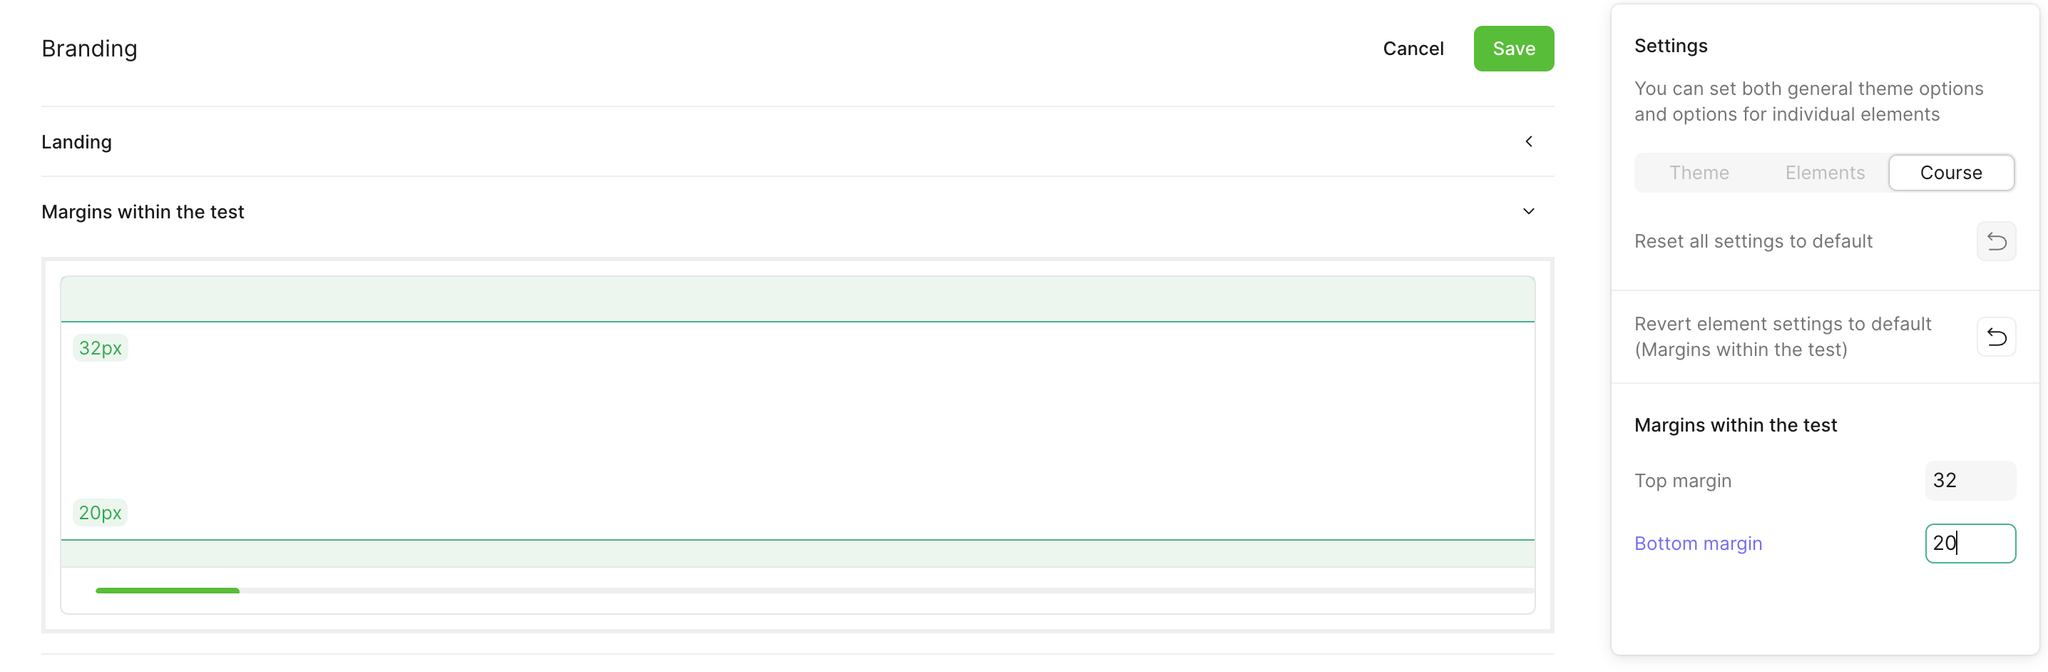
The text type and style settings have not changed.
Now you have the opportunity to further customize your course and choose a style for each text type. The same option has appeared in Branding section so that you can set settings for several courses at once.
Image without caption
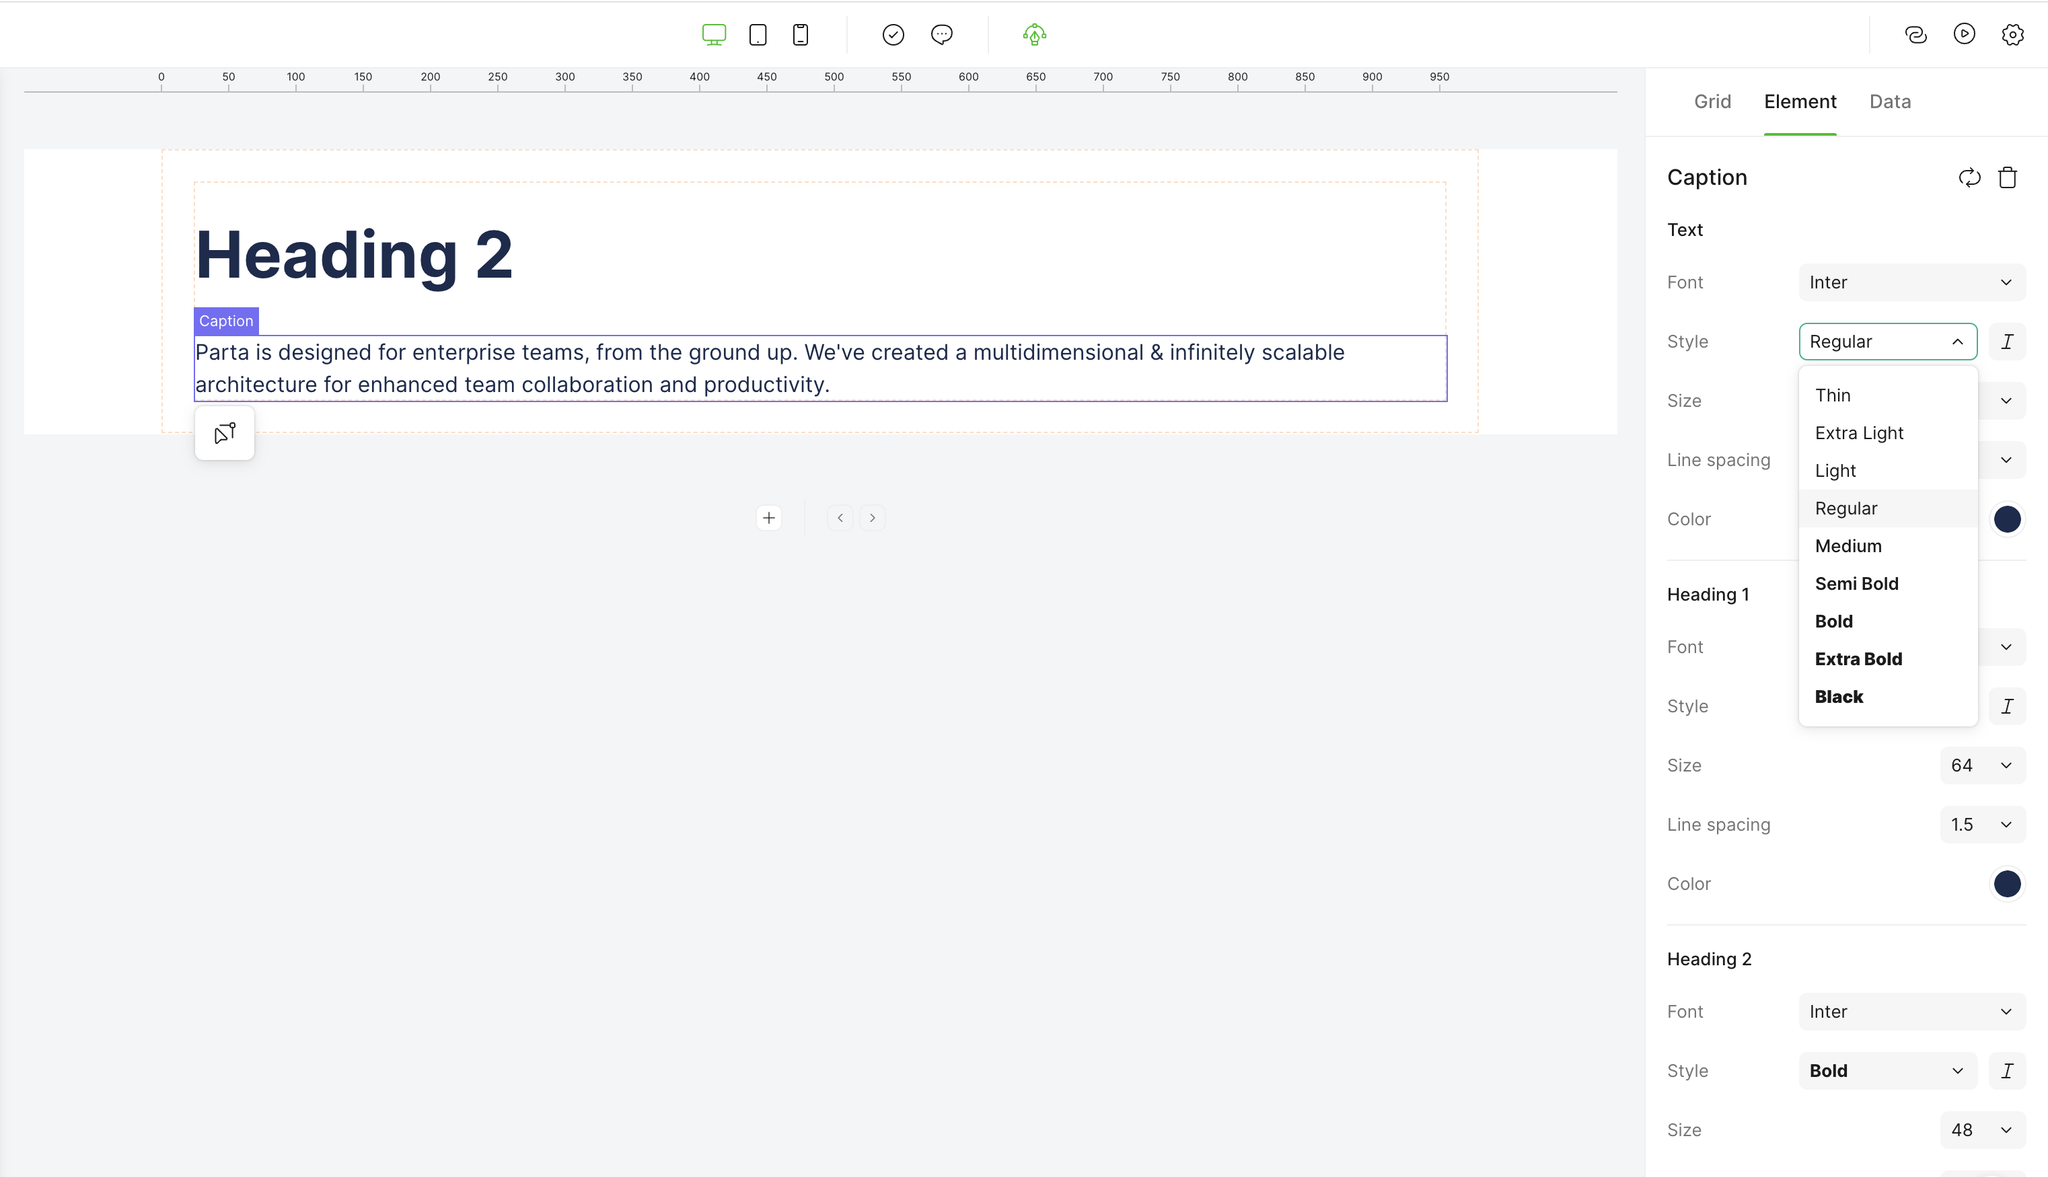
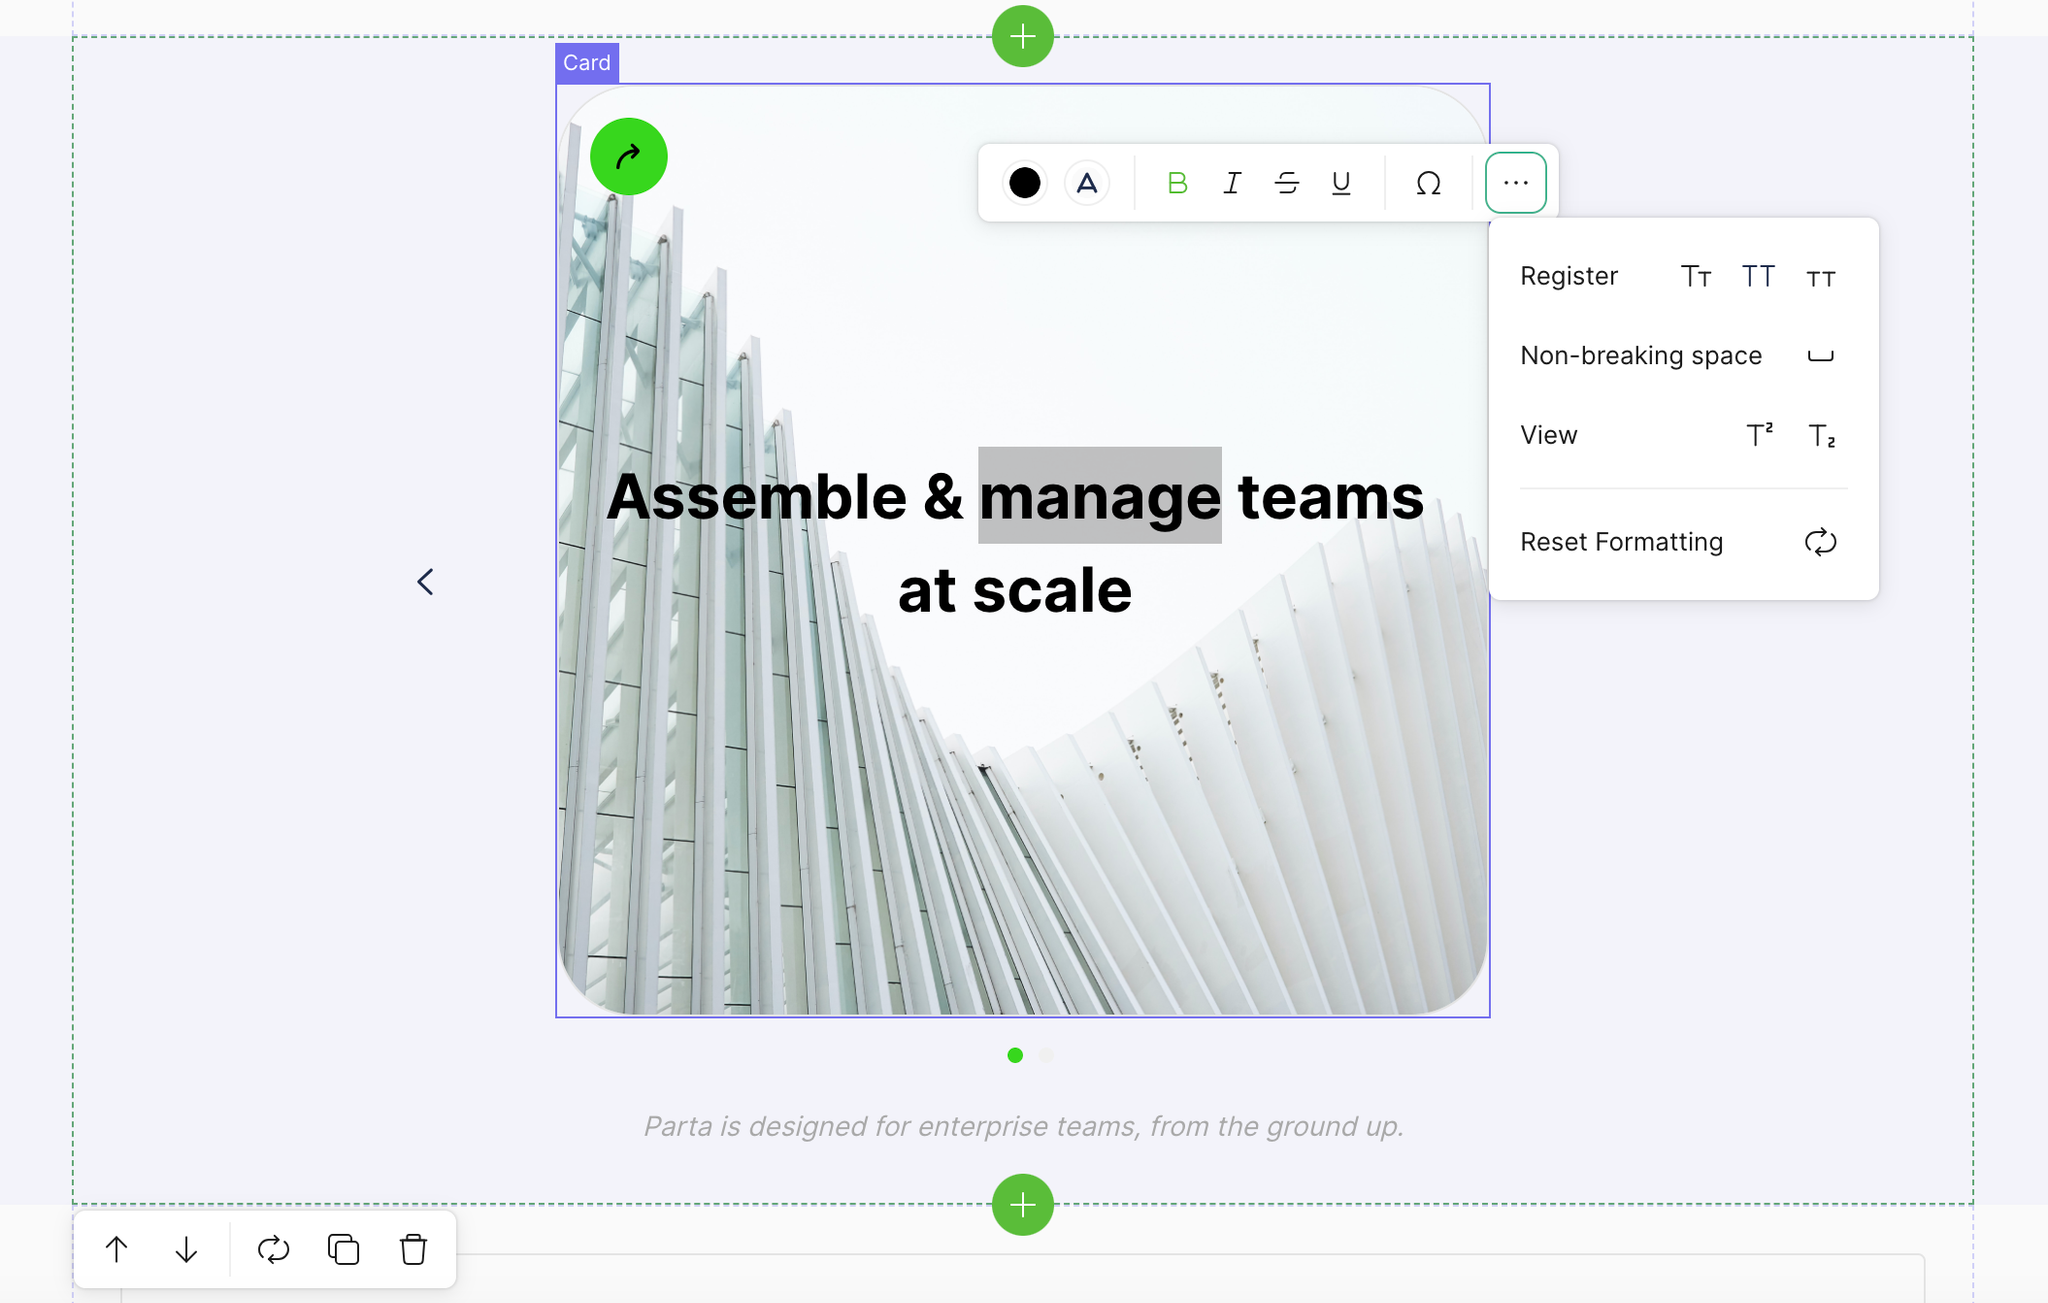
The ability to select bold and italic styles in content mode depends on the fonts loaded in the family. If they are not present, the browser modifier will be applied.

2.33
#Changed
Project
Usability
2 months ago
Left sidebar menu in the editor now looks completely different: we have simplified its logic and design, and also added several tabs:
  • contents, so you can quickly switch between sections;
  • block structure, as in Pro mode;
  • a grid that helps you navigate through layers in complex blocks;
  • notifications to keep you up to date with mentions and discussions.
Image without caption

2.33
#Changed
#Improved
Usability
Project
2 months ago
Meet the new more convenient modal window for working with templates! We've speeded up the opening of the window and completely changed its design:
  • added new sorting options: “Popular” (at the company level; this includes the templates that you and your colleagues use most often) and “Recently used” (at the project level; the 10 most recently used templates are displayed here);
  • moved the tags to the left and made the template captions more visible, for you to quickly find the ones you need.
Image without caption

2.33
Collaboration
#Improved
2 months ago
The more opinions, the merrier. We have reworked the logic of public links and comment links, so that you could conveniently share projects, and also fixed all the bugs in relation to them.
Now, all your colleagues can look at the course via a public link, and you can send a link for commenting to:
  • new users;
  • users who have been removed from the company;
  • users with viewing and commenting permissions.
If a colleague does not have permission to comment and preview the project, then you will not be able to share the comment link with them - the system will show an error.

2.33
#Added
Usability
2 months ago
Managing emails and notifications from Parta.io is easier than ever now! We’ve divided all of them into groups, so that you could choose which ones you want to receive, in the “Notifications” tab. Pinky promise that we’ll send you only the important stuff!
Image without caption

2.31
#Changed
Usability
Collaboration
3 months ago
When opening any dropdown list for selecting users, for a company or project, you will notice that interacrting with it has become even more convenient. This is due to the addition of:
  • a cross icon for removing a user from the list;
  • indication of an invalid email address;
  • a growing user field.
Image without caption

2.31
#Changed
3 months ago
We are constantly improving the design of the platform itself. This time, we have set a unified color theme for permission labels that are being displayed:
  • in the user profile;
  • on the “Users'” page;
  • on the project team page.
Image without caption

2.31
#Changed
Usability
3 months ago
We have reworked the design and and content of the cards for:
  • projects;
  • companies;
  • tasks;
  • collections;
  • resources;
  • templates;
  • elements.
With new data display rules and field formatting, you will be able to quickly find the information you need and easily switch between cards.

2.31
#Changed
Corporate Administration
3 months ago
We have changed the content of the “Company Settings” page to ensure that all the necessary fields are at your fingertips.
Image without caption

2.31
#Added
Usability
3 months ago
To make it more convenient for you to track the export process, we have divided it into stages and added the completion percentage to each. You will clearly see which part has already been processed and when the process will be completed. And another new feature - export cancellation. Now you can stop the process, make changes to the course, and start the export again.
Image without caption

2.30
#Improved
#Changed
Usability
Branding
4 months ago
We've all been waiting for this for a long time. We’ve taken a step back and three steps forward, and completely redesigned the branding page. Experience the enhanced visualization with even more real-time previews of elements. This makes branding courses more intuitive than ever before!
We’re very excited for you to see what we came up with! Here goes.
➢Introducing separate tabs for granular branding from general theme to specific element styles:
  • “Theme” is where you can set the main style of your branding.
  • “Course Page” is where you can manage indents, buttons, and page elements.
  • “Elements” is where you can control the visual styles of every course element.
  • “Advanced” is where you can manage your main color palette and custom colors.
Note: Each color in the palette controls the main color of the element and its font color.
➢ With a live preview of your course styles, you can now instantly see the changes you make to fonts, headings, and other settings.
➢ We’ve made a more convenient link for the task card:
The task card now contains the link to the editor, so you can open and work on several tasks at once in different tabs.
➢The Company Level Tasks page now has two links:
  • The one at the top jumps to the task in the editor in a new window.
  • The one at the bottom jumps to the task in a modal window.
Note: The links throughout the project pages now have the same format. Just to make your job a bit easier ;)
➢ Improved rich text in lists: now, when populating the list, you can:
  • Create a new item using the Enter key.
  • Skip to a new line without creating a new list item via Shift + Enter.
You can also insert a ready-made list from an external source into the “List” template.
With improved mechanics, working with lists is now much easier! No need for constant back-and-forth between the main screen and the side menu while adding an item.

2.30
#Improved
4 months ago
We have worked hard to improve how course completion data is transferred to the SAP LMS:
  • New feature: export in Scorm Edition 3.
  • Improved timing settings for saving data and multiple choices for the “Save state” parameter.
  • New feature: saving states for test performance is now available even while updating the page.
  • Enhanced embedded elements, embedded code, and improved data transfer from these elements.
Note: To maintain the correct completion of the course in SAP, we recommend setting one of the statuses: “Closing”.
Image without caption

2.30
#Added
Project
4 months ago
Now you can easily change the one responsible for the tasks and overall project completion. A useful feature for managers who wish to discontinue receiving notifications from projects they are no longer part of.
Here’s how you change the project’s owner:
  • Add the new owner to the project's team.
  • Select them from the list of team members.
  • Assign them as the owner by clicking the button at the top.
We have thought out the most convenient way for you to transfer rights and roles! The new owner will receive a notification of their assigned role in the project. The former owner will remain in the project with the same set of rights.
Note: Only a user with the ‘Create Project’ permission can be assigned as the owner.

2.29
#Improved
Templates
4 months ago
We've streamlined the search experience in our template collections:
  • The app conveniently remembers the last template collection you interacted with. When you add a template next time, it will automatically open the recently used collection alongside your favorites.
  • Searching is a breeze: search not the folders, but the actual template names. Hierarchy, grouping and sorting search results will allow you to quickly find the templates you need.
    • Image without caption

2.29
#Changed
Usability
4 months ago
Introducing a revamped user profile page where you can easily manage your personal info:
  • Stylish & Intuitive: the UI features an updated look & feel.
  • All-in-One Management: edit everything in one spot – name, phone, avatar, app language, and manage roles and permissions for specific companies and projects.
  • Simplified Control: No more clutter! Only see what you can edit, keeping things clean and easy.
Image without caption

2.29
#Added
Usability
4 months ago
Copying a user’s company ID is now effortless with our new one-click feature. Sharing projects has just become much easier.
Image without caption

2.29
#Added
Usability
Corporate Administration
4 months ago
We're thrilled to introduce a new drag & drop feature for our task board, providing a definite boost to your teamwork efficiency!
Simply move tasks up and down within a column to rearrange them. This gives you the power to prioritize tasks or sequence them in the order they need to be completed. We hope this update streamlines your workflow and keeps your team perfectly aligned!
Image without caption

2.29
#Added
Collaboration
4 months ago
Creating, discarding, highlighting, scrolling, and other comment section interactions have been enhanced with refined and distinct visualizations. We’ve improved the experience in discussions and tasks, making it smooth and seamless.
Image without caption

2.29
#Improved
Usability
4 months ago
Our goal was to make your team management as productive as possible.
Here’s what we came up with:
  • Improved search and filtering on the project team page.
  • Introduced group actions applied to team members.
  • A user's avatar is now always displayed next to their name. No more guessing who is who!
  • The settings for the Details views (column order, element type, etc.) on various pages (team, tasks, resources) are now saved, so the information is always displayed to your preferences.
We hope this makes managing your project teams even more convenient!

2.29
#Improved
Branding
4 months ago
We've embarked on the first steps of a comprehensive redesign for the Branding page. Soon, applying styles to projects will be easier, faster, and more intuitive! In this release, we've made some improvements to the Branding preview:
The updated 'Test margins' setting in the preview now enables you to view changes in real-time. This eliminates the need to switch back and forth between the branding and course preview pages. Changes in margin values are visually demonstrated right in the branding preview. What you see is what you get!
Image without caption

2.28
#Added
Collaboration
5 months ago
Now, recipients can leave comments without signing up on the platform. This is particularly useful when collaborating with experts, external users, and focus groups.
You can invite both existing company users and new ones by adding their email as a collaborator. Invited users will be added to the course as participants with "Comment" permission, and to the company as temporary users with the "Commentator" role.
The invitation link remains valid for 21 days. After that, you can re-invite the user. If you need to restrict access earlier, remove the invited user from the course using the modal window or on the course team page.
Image without caption

2.28
#Added
Collaboration
5 months ago
Now, you can attach files and leave comments directly on saved tasks. This allows for the convenient organization of all important details in one place!
In addition, we have added rich-text functionality to the task description. This allows you to add lists and edit the text according to your preferences. With this enhancement, tasks can be customized to meet your specific needs and preferences.
Image without caption

2.28
#Changed
#Improved
5 months ago
To easily customize the display of data in your company or project, we have expanded the functionality of tables and made changes to the design. Now you can manage the number and order of columns in the tables, and the column width adjusts to the content.
💡
The visual display of tables is customized for each project participant individually, so that everyone can work in a structure that is convenient for them.
Image without caption

2.28
#Added
Assessment
5 months ago
We are aware that many people have been requesting the ability to export courses in SCORM 1.2 format, and we are pleased to announce that this feature is now available. You can now use the Export tab to export your course in the new format.
Image without caption

2.27
#Improved
Assessment
6 months ago
Announcing enhanced navigation control! With the recent 2.23 update, you now have the flexibility to customize your course's flow - whether it's free or linear.
In response to numerous user requests, we have made improvements to the functionality of linear course progression. The enhanced feature now allows you to customize the flow for your students. If a student fails a test in the course, you have the option to choose the alternative path for the student to proceed:
  • Continue with the course;
  • Restart the test until they achieve the required score for the test completion.
This update puts you in the driver's seat, allowing for a more tailored and responsive learning experience.
Image without caption

2.27
#Improved
Usability
6 months ago
Working in the editor is now even more convenient, thanks to several enhancements we have made:
  • the right sidebar menu now floats like in the course “Contents”;
  • the “Save as template” and “Block history” options have been moved to the right sidebar menu;
  • the “Feedback” element now has tooltips;
  • scrolling to active blocks has been improved;
  • the icons for adding templates and elements in different modes have been updated.
Image without caption

2.27
#Changed
Project
Usability
6 months ago
You can find needed projects in an instant with the new “Filter” and “Sort” capabilities in Parta. Here are some of the enhancements:
  • new color identification for different sorting groups, making it easier to navigate;
  • consistent appearance of the "Filter" and "Sort" elements in headers across different pages in Parta;
  • reset button to revert selected sorting and filtering values back to default settings.
Image without caption

2.27
#Improved
Assessment
6 months ago
We have added the ability to reset the state of courses that have already been published, for cases where an already uploaded course in an LMS is outdated or requires further improvement.
This logic applies to situations where two courses from different projects are uploaded into a single project in the LMS.
To ensure that the LMS passes the completion data correctly, we recommend making a copy of the project in Parta and uploading it into the existing course container.
💡
We recommend doing this in cases when the course has undergone significant changes that may disrupt the functionality of the new version. For example, if a section or block that was referenced has been removed, or if the question list has been modified.
To inform users about the changes, we have added a modal window that will appear in the following scenarios:
  • If a student has completed the course, the system will offer them the option to reset the progress or keep it as it is.
  • If a student was in the process of completing the course, the system will suggest resetting the progress and starting over.
  • If a student has not yet started the course, they won't see any notifications.

2.27
#Added
Assessment
6 months ago
With the new 2.27 release, we’re introducing an option to pass the completion progress as a course score. Meaning, if previously the score was passed only based on the final test, now the courses without a test but with a specific setting will receive both values: completion percentage and score.
To pass data in scores, select the “Passed/in progress” status in the settings.
💡
This feature is useful because some LMS platforms track course progress based on scores, even if it doesn't include a test.

2.27
#Added
Assessment
6 months ago
In Parta, the test section should include not only questions but also the “Start” and “Results” category blocks. We have modified the element adding window in the editor so that blocks from different categories are stored separately and you can find them quickly.
You need to set one template each for “Start” and “Results”, and as many as needed for the test questions. Depending on whether a template was selected or not, the category can have one of five statuses:
The statuses help you not to forget to add the mandatory “Start” and “Results” blocks.
Image without caption

2.26
#Added
Collaboration
7 months ago
In the 2.24 release we have added a real-time user presence in the editor, and now this feature is available throughout the whole project. Simply click on your colleague's avatar in the top right corner of the page, and you will be taken to the project page where they are currently at.
No need to refresh the task page anymore to see the updated list. New tasks are instantly displayed on the page after creation, allowing you to start working on them right away.

2.26
#Improved
Corporate Administration
Usability
7 months ago
Introducing the fully upadated tasks! Here’s what has changed:
  • We’ve added a kanban board with all company tasks. However, you can easily switch back to the list view, if you find it more convenient.
  • The kanban board offers more features for task management: filters, drag-and-drop functionality, and additional columns.
  • You can now use filters or search to quickly find tasks for specific projects directly from the company’s main page.
  • Tasks settings have been streamlined and are now conveniently displayed in a single window.
  • Changing task statuses is no longer limited to a sequential order, you can update them freely.
  • By default, tasks are displayed as cards, but you can customize the view to a table format.
  • It is now possible to create tasks for an entire project.
  • New fields have been added, such as “Number”, “Title”, “Creator”, “Project”, “Location”, “Deadline”, “Status” and “Assignees”.
  • Clicking on a link within a task allows for quick navigation to a specific block within the editor.
Image without caption

2.25
#Improved
7 months ago
We have updated our role model and permissions. Now users can have one of the following roles in the company:
  • Owner has access to all platform capabilities, and will also be able to delete the company if necessary.
  • Administrators have access to all platform capabilities, can invite users, manage their permissions, create and edit projects, manage branding, create tasks, and assign responsible users.
  • Employees have access to all company projects and can view and comment on them, but can't edit (unless they're invited to work on the project or are provided with additional permissions).
  • Guests are invited users who can view the project or specific part of the project (a section or block) that they were invited to.
The user who creates a project is assigned the role of Owner for that project. They will have access to all editing capabilities and teamwork in the project. They can also invite members to the project and delete the project.
When a user is invited to be a member of a project, they will be assigned the role of Member. The project owner will specify the required permissions for members.
Permissions:
  • Users: Can invite other users to the company or project.
  • Creator: Can create folders and projects in the company.
  • Branding: Provides access to branding.
  • Team: Can invite members to the project.
  • PRO mode: Unlocks access to PRO mode.
  • Content: Can edit blocks (provides access to the course editor).
  • Share: Can share the project via a link and export the project.
  • Comment: Can leave comments.
  • View: Can view the project.

2.25
#Added
Usability
Project
7 months ago
To make courses more interactive and engaging, we have introduced animation features:
  • for the appearance of list items;
  • for the opening and closing of labeled graphics.
By default, animation is enabled for these elements. However you can disable it in Pro-mode on the “Element” tab within the “Animation” group.

2.25
#Created
Corporate Administration
7 months ago
Previously, invitations were only valid for 12 hours, and not everyone had enough time to accept them. We have now extended this period to 24 hours and added the option to resend invitations. To do this select the user from the list, click on the “Actions” button and choose the “Resend Invitation” option.
Additionally, we have introduced another new feature, that allows you to restore a user who has been deleted from the company. Once you click on the “Actions” button and select “Restore”, they will receive an email with a link to the platform.

2.25
#Added
Templates
7 months ago
No more confusion with templates, because now you have “Collections”. You can store your templates there and add them to the course as a whole group.
Image without caption
A dedicated page “Collections” has been added to the main menu, where you can find and access all the collections available to you.
You can make various modifications to your collections: create new ones, customize the branding, duplicate or delete them. You can also edit the templates, filter or remove them from the collection.

2.25
#Added
Editor
Templates
7 months ago
Did you accidentally delete a block or do you want to bring back a part of the material to the section? No worries, deleted blocks are now moved to the “Deleted” tab in the “Add block” window.

2.24
#Added
Localization
Project
8 months ago
Manage all course settings in one place with the new Description page design! We've added two tabs to the page:
  • The General tab shows the course name, its description, tags, branding, and owners;
  • The Localization tab is where you can configure the interface language and manage all rows in the course.
Image without caption

2.24
#Added
Assessment
8 months ago
Assessment is an important part of the learning process. That's why we've added more ways to customize it. Now you can:
  • set the number of attempts for the whole test and for individual questions; and
  • set up a button to repeat test questions for various types of feedback.
Image without caption

2.24
#Added
Collaboration
Usability
8 months ago
Do you need to invite several users to your company? Now it's simple: just copy all email addresses, paste them in the "Email" field, and click Enter. That's it! All emails have been added.

2.23
#Changed
Editor
9 months ago
When you're planning out a course, it's important to understand how it'll look to the end user. And in this respect, splitting content into blocks isn't the most convenient since the longread appears as a seamless page. So we've changed the content management mode to make sections sequential, exactly the way it'll look to your readers.
Image without caption

2.23
#Added
Project
9 months ago
Previously, the platform would automatically generate course IDs, which could only be changed manually in the downloaded file. Now it's faster and easier, and can be done right in the platform on the Export page under LMS Settings.
Image without caption

2.23
#Added
Editor
9 months ago
Easy navigation is essential for working quickly, which is why we've added the ability to navigate within the block structure to Pro mode. Three new icons now appear under the templates in the workspace:
+: Adds a new block after the one currently open in the workspace;
←: Returns to the previous block;
→: Proceeds to the next block.
Image without caption

2.23
#Added
Editor
9 months ago
Free-form courses are convenient for users, but sometimes it's important to provide information step by step. That's why we've added a linear option.
Here's how it works: when users open the course, the menu is locked, and blocks will unlock as the user progresses. In other words, when the user reaches the third section, they'll be able to go back to the first and second, but they won't be able to unlock the fifth just yet.
The progress sequence is configured in the course settings.
Image without caption

2.23
#Improved
Editor
9 months ago
When you're working on a course, sometimes you may want to go back to a previous version to check, for example, what the text looked like prior to changes or to compare a previous version to the current one. We now save earlier versions for 30 days. This option is only available for blocks of content, not for courses as a whole, so you can easily find particular changes.
Image without caption

2.22
#Added
Corporate Administration
9 months ago
Copy your projects to any company. Copying project helps you to easily share source materials, for example, with customers. Detailed instructions can be found at the link.
Image without caption

2.22
#Added
Project
9 months ago
Selecting several sections is just the beginning. We've also expanded management capabilities: create unique sections and easily copy them to other company projects. You can decide how your projects will look on Parta.

2.22
#Added
Editor
9 months ago
Getting your users' attention is really important, so we've added a new tool for various course elements: the smooth transition animation.
You can enable this animation for all courses in the Branding tab > Course > Landing.
Image without caption

2.22
#Added
Editor
9 months ago
Large videos aren't a barrier to learning! Now you can compress video files during course export under LMS Settings. Standard compression resolutions are available: original or default; 1080p, 720p, 480p, and 360p. The selected resolution will be applied to all video files in the course, which can significantly speed up how much time it takes to prep and download your project.
Image without caption

2.21
#Changed
Usability
Project
10 months ago
We've moved the link settings to a new project menu and changed the content.
Now with one click on the Share Link icon, you can enable or disable link access and copy the provided link to a project.
You can also create links to individual sections and blocks in various chapters.

2.21
#Added
Editor
10 months ago
Work with elements without restrictions. Now you can freely and easily edit text within elements as rich text.
Double click on the text you want to edit and choose whatever option you need:
Image without caption

2.21
#Added
Editor
10 months ago
The History page allows you to see a list of all exported versions of your project and download them. This update gives you the ability to track changes to projects and return to more current versions.
Image without caption

2.21
#Added
Branding
10 months ago
A small but useful update for everyone who uses branding. Previously, it wasn't possible to edit the course completion button and modal window that displays the completion status. Now you can configure these elements and use them in all courses.

2.21
#Created
Corporate Administration
10 months ago
We've added a Home chapter where active projects, tasks, and current discussions are assembled. Previously, you could transition between projects using the Catalogue, but we've simplified the process.
Included in this chapter are:
  • All tab: shows all information about the project, tasks, and notifications;
  • Projects tab: contains a list of the latest active projects;
  • Feed tab: contains thread notifications;
  • Project widget: displays the number of projects you're working on;
  • Updates widget: leads to latest updates in release notes;
  • Add Project button: creates a project.
Image without caption

2.20
#Added
Editor
11 months ago
Good news for anyone who's tired of switching between content and editing modes to create templates and change their text. Now you can edit rich text directly in Pro mode and draft content much faster. To change or add text in Pro mode, click on the fill icon that appears on the highlighted element.

2.20
#Created
11 months ago
Safe and stable operation is above all else! That's why we've introduced 2 new rules to protect you from DoS attacks:
  • If your account is inactive for 90 days, it will be locked and a notification will be sent to the email address listed on the profile;
  • If you enter your password incorrectly 5 times in a row, your account will be locked for 10 minutes.

2.20
#Added
Editor
11 months ago
Working with tables just got easier! We've changed the interface: we transferred the settings for adding new rows and cells from the sidebar menu to a pop-up so you'll always have them handy. We also added cell fill colors and automatic column alignment by width.
Image without caption

2.19
#Added
1 year ago
We value your time, so we added a progress bar for PDF downloads.
Now after clicking on the Download PDF button, you'll see the progress for creating and downloading the file.

2.18
#Added
Project
1 year ago
The Exclude setting allows you to select chapters, sections, and blocks that should be hidden in the course. They won't be displayed in the SCORM package, PDF, or preview, including navigation elements and content.

2.18
#Improved
Editor
1 year ago
Imagine being able to add rich text and edit it quickly and easily without going to the settings menu. Well, imagine no more! We've added this feature to the new release, along with a few other improvements.
You can:
  • align text width;
  • insert symbols like guillemet, square root, and more;
  • add subscripts and superscripts in course text blocks;
  • insert links in course text blocks.
Use rich text and improve the quality of your courses with Leenda.

2.18
#Added
Collaboration
1 year ago
Now you can look over comments on the preview page, so you don't have to navigate to each block, but instead can see all progress in the entire course. Convenient, right?
Image without caption

2.17
#Added
Branding
1 year ago
We've expanded the branding settings.
For each corresponding section, you can configure:
  • the appearance of the course header;
  • the sidebar navigation display;
  • answer results in tests; and
  • navigation buttons.

2.17
#Added
Editor
1 year ago
How do you make sure that employees don't just skim the course, but actually study the materials and immerse themselves in the subject? Apply settings to the Continue button.
Now you can lock it until the following conditions are met:
  • All blocks passed: in order to continue, the user has to go through all material that comes before the button (for example, watching a video, listening to audio, flip over cards, open tabs, etc.);
  • Block above passed: the user has to go through material the comes before the button.
Image without caption

2.17
#Added
Editor
1 year ago
Changing the background of blocks just got easier! Select the desired block and specify the desired color in the settings menu on the right.
Image without caption

2.17
#Added
Editor
1 year ago
The Code element displays the code for technical specialists in the usual format. It supports 10 programming languages: HTML, CSS, JavaScript, Markdown, PHP, Java, Python, C/C++, SQL, and Node.
Image without caption

2.17
#Added
Assessment
1 year ago
Working together to create educational courses has never been easier or more efficient!
With the new update, you can work with your colleagues on a project in real time. Using fewer resources means more results!

2.17
#Added
Collaboration
1 year ago
The Exclude setting allows you to select chapters, sections, and blocks that should be hidden in the course. They won't be displayed in the SCORM package, PDF, or preview, including navigation elements and content.

2.16
#Changed
Editor
1 year ago
New design, new effects. We've updated the Reveal element with that in mind.
What's new:
  • Changed the slider design;
  • Added the ability to upload your own icon/picture to replace the standard slider;
  • Added the ability to set the initial slider position on a scale of 0 to 100, where 50 is the midpoint;
  • Pictures in the reveal element can now be cropped like regular images;
  • Added the ability to use a background instead of a picture;
  • Added the ability to insert text to the left and right of pictures, as well as set the text alignment (left, right, or center).
Image without caption

2.16
#Changed
Editor
1 year ago
Working with resources just got easier.
We've changed the file upload modal window at the company (or project) level. Now they'll display the download progress for one or several files, and you'll be able to pause or cancel uploading one or several resources at any time during the process.
You can also add files using drag & drop by dragging files for upload onto the editor screen.
And the cherry on top: you can sort alphabetically or by date added. To enable this, click on the "sort" icon in the top left corner of the file selection modal window and specify how you want to sort.

2.16
#Added
Templates
1 year ago
It's not just books that can be judged by their covers, but courses too. That's why we created a new collection of cover templates too. Use them to engage your users from the very first page.
Image without caption

2.16
#Added
Templates
1 year ago
Create even more unique content with templates!
In release 2.16, we've updated the standard collection and added new templates. To use a template, click on the plus icon in the block feed.

2.16
#Added
1 year ago
The Active Labels element looks like an image, on which you can place labels with additional descriptions. You can also customize the element to suit you by selecting sequential numbering for labels and icons.

2.16
#Added
Assessment
1 year ago
Assessments should take into consideration the needs of various users. For that reason, we've added a new, helpful option: tests in the Longread section. Now you can insert small test questions into theoretical materials to make them more interactive. The feature also allows students to practice their knowledge not just in the test, but in the Longread as well.

2.14
#Improved
1 year ago
Welcome to the big update that improves interaction between Leenda and LMS's.
First, we added conditions for course exporting to be considered complete:
  • By test: If a user scores the required number of points;
  • By course: If a user views/scrolls through a certain percentage of the course.
You can configure these conditions in the project menu > Export Settings > Export section.
Second, clicking on the "Complete Course" button transfers the data to the LMS and opens a modal window informing the user that the course has been completed.
Third, any test element in the longread can now be retaken.
Fourth, we added a debugging feature to search for potential errors in the LMS.
To enable debugging:
  • Go to the Export menu section;
  • Toggle the Debugging button to the "Yes" position;
  • Upload your course to the LMS;
  • Click on the gear icon in the top right corner;
  • Click on the "Save debug data" button.
And the final update: a progress bar for SCORM package downloads.

2.14
#Added
Collaboration
1 year ago
Creating courses is a team job, and it's important to be able to collaborate successfully in order to achieve that.
Now you can do just that in Parta: leave comments in the course, add feedback for your colleagues, or leave important notes for yourself.

2.13
#Added
Editor
1 year ago
We're constantly expanding our list of supported formats. Now you can upload videos in M4V format.

2.13
#Changed
Editor
1 year ago
We've improved the Grouping element. Now you can:
  • upload pictures as cover photos not just for answers, but for groups as well;
  • crop uploaded pictures;
  • use colors for group and answer fills.
We also corrected some issues with adapting and fading images, removed character limitations for answers, and changed the way answers are tallied. If the answer is incorrect, it will be moved to the "Incorrect" group and the user will be notified that the answer is incorrect.
Image without caption

2.13
#Added
Project
1 year ago
With this update, you won't need to worry that someone will accidentally change a finalized part of the course.
You can prevent editing in both the longread and tests.
To do this, select longread/test in the course structure and toggle the Lock button to the "Yes" position.
Locked sections cannot be edited to change content.

2.13
#Added
Assessment
1 year ago
You've asked for this one often, and we added it!
Now you can configure answer shuffling for every question.
To enable, select the question and toggle the Shuffle button to the "Yes" position.
Powered by Notaku